
Edcast Standalone How-to Tutorial - Icecast or Shoutcast
Step 1 - Install Edcast Standalone
Download Edcast Standalone software and install it. This is a free application that can broadcast live audio to Icecast or Shoutcast servers. Edcast doesn’t require any other software to operate (hence the name ‘Standalone’), and is ideal for 24/7 live streaming environments such as streaming an AM/FM station over the internet.
Link - Click Here to Download Edcast Standalone
Step 2 - Install the LAME MP3 Encoder
- (1, 2) Right click the link below and choose “Save As…”
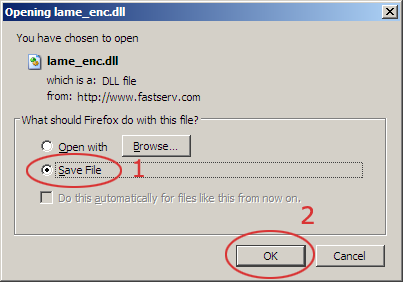
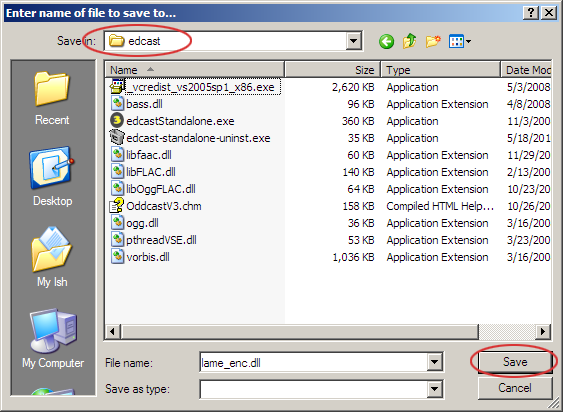
- Navigate to ‘C:\ Program Files \ edcast’ and click ‘Save’. It is VERY important that you save this file inside the actual Edcast program folder.
Step 3 - Start Edcast Standalone and configure the encoder
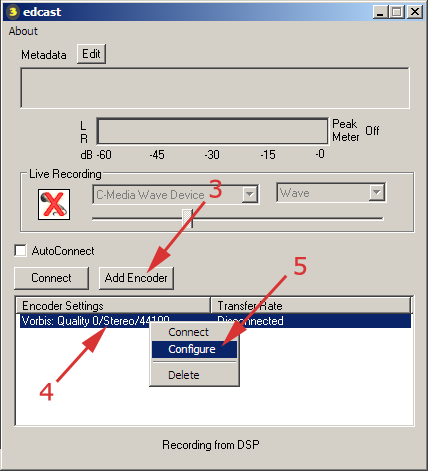
- (3) Click the ‘Add Encoder’ button
- (4) Right-click the new encoder that appears below it
- (5) Choose ‘Configure’ from the menu that appears
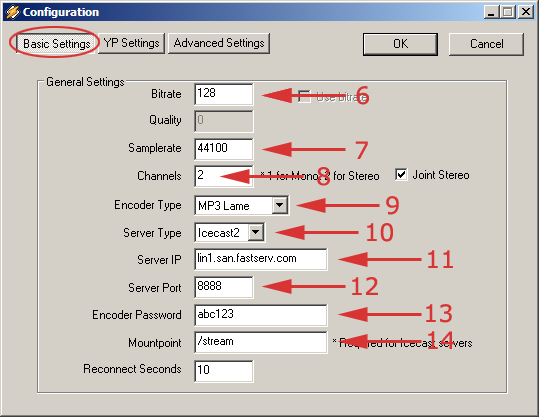
In the ‘Basic Settings’ section, set up the encoder.
- (6) Enter your chosen bitrate - this must be equal or lower than the rate you purchased.
- (7) Enter your samplerate - Enter 44100 for bitrates above 96, or 22050 for streams below 96.
- (8) Number of channels - Enter 2 for bitrates above 48, choose 1 for bitrates below 48.
- (9) Select the ‘MP3 Lame’ encoder
- (10) Select ‘Icecast2’ for Icecast server, or ‘Shoutcast’ for Shoutcast server.
- (11) Enter the host name of your server.
- (12) Enter the port number of your server.
- (13) Enter the DJ or Admin password of your server.
- (14) (Icecast2 only) Enter the mount point - this will usually be /stream by default for Fast Serv Icecast2 servers.
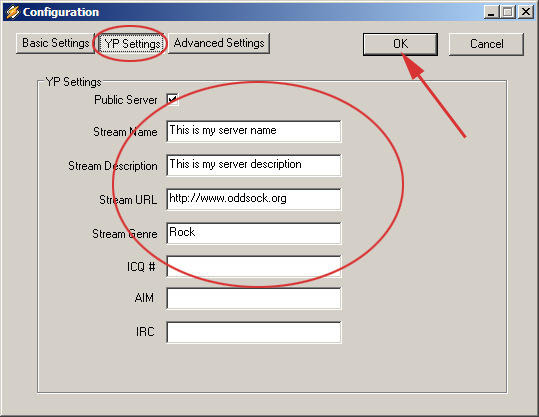
- In the ‘YP Settings’ section, enter your station details.
- Click ‘OK’
Step 5 - Start encoding
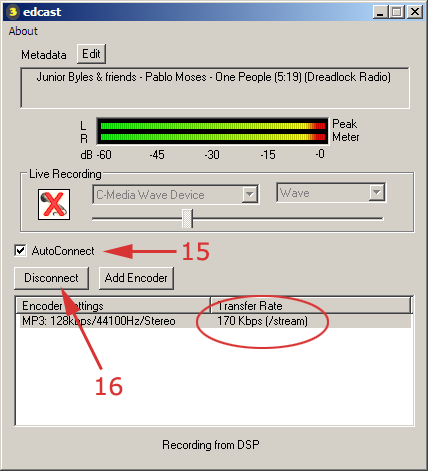
- (15) Tick the ‘AutoReconnect’ box
- (16) Hilite the new encoder, then click the ‘Connect’ button
- You should see information about the encoder status in the ‘Transfer Rate’ column. If it’s working properly, a numeric value will appear indicating the transmission speed.
Notes
- If you are unable to connect, go back to step 4 and double check every server setting. You must also make sure there is music playing in Winamp.
- You can then select the audio device you wish to capture audio from - select it under ‘Live Recording’.
You’re now streaming live on the Internet!
Share the Love
Back to Streaming Media
